

If unwanted alerts name Chrome and a website, review that website’s notification permission in Chrome. Blocking pop-up windows is a different control. Start by identifying where the message comes from, then change the relevant permission rather than making unrelated browser changes. The steps here cover desktop Chrome; Android, iPhone and other browsers have different controls.
In this article
First identify what is appearing
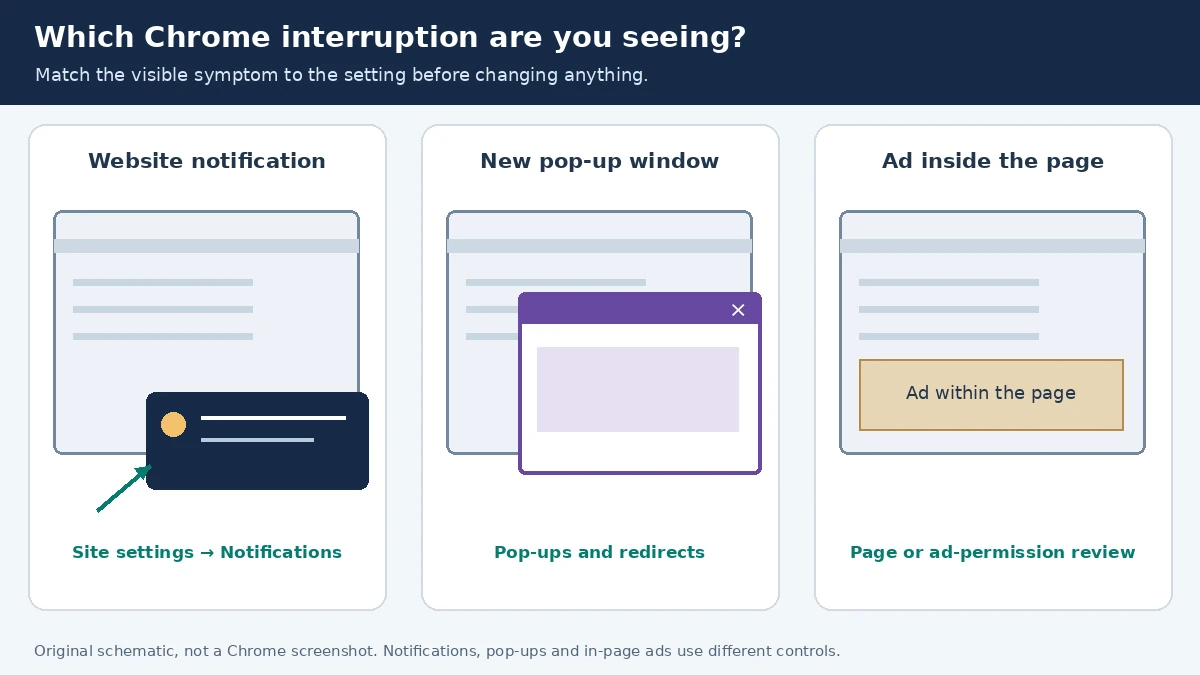
A notification is an alert delivered outside the ordinary page content. A pop-up is a new browser window or tab opened by a site. An advertisement inside the page is another case. These distinctions matter because Chrome has separate controls for site notifications and pop-ups. Google’s pop-up guide specifically notes that continuing communications after blocking pop-ups may come from a notification subscription.
Read the source shown on the alert without clicking its main message. If it names a site, note the address accurately. A message saying that your computer is infected is a claim made by the sender; the wording alone does not establish that a security product has scanned the device. If you need to check device security, open the security software through its normal trusted route.
For a hypothetical example, suppose you once allowed alerts from a recipe site and now receive frequent promotional messages. The immediate question is whether that site still has permission to notify you. Turning off every sound on the computer would make the interruption quieter while leaving the underlying decision unresolved. Removing all browsing history would also be a broader change than this problem requires.
Review the site list in Chrome
Open Chrome’s menu, choose Settings, then Privacy and security, Site settings and Notifications. Review the allowed sites and match the address shown on the unwanted alert. You can block that entry through its menu. Another route in Google’s notification instructions is to select Add beside “Not allowed to send notifications,” enter the site’s web address and select Add again. Check that the correct address appears in the blocked list. You can do this through Settings without reopening an unfamiliar site.
Match the domain, rather than relying on a familiar word in the message. If several entries are unfamiliar, review them individually. Do not add an unfamiliar site to the allowed list in an attempt to dismiss its request. If the listed address does not match what you saw, pause and collect the source information from the next alert instead of guessing.
There is a useful difference between silencing one unwanted sender and deciding whether you want future permission requests at all. After dealing with the existing site, review the default notification-request setting. Choose the behaviour you want for future visits. An old permission and a new request are different things to check; review both before considering the job finished.
Keep wanted alerts in mind. If you rely on notifications from a work service, changing the relevant unwanted site preserves a clearer distinction than suppressing all Chrome alerts at the operating-system level. Conversely, if you want no browser alerts, a broader choice may suit you. Decide from your needs rather than treating one setting as right for everyone.
Check the result without clicking a suspicious alert
Consider a second hypothetical case: two people use different Chrome profiles on the same computer. One profile has an unwanted site allowed, while the other does not. Before repeatedly changing settings, check that you are reviewing the profile associated with the alert. Write down which profile and site you changed so you have a clear record if the problem continues.
After blocking the site, dismiss any already visible alert. A notification remaining on screen is not a useful way to judge whether another will be sent. Continue normal use and pay attention to the source of any new message. A fresh alert naming a different site needs a separate permission review. Do not re-enable the original permission simply to provoke another warning as a test.
Chrome may remove some permissions automatically, including permissions for sites you have not visited for a while. Its Safety Check can show removed permissions. Review the information before restoring anything: a removed permission may be consistent with exactly the quieter browser you wanted. An automatic removal also does not mean every remaining permission is one you still need.
If a setting is locked on a work or school device, ask the administrator to review the named site and the policy involved. Give them the address and the behaviour you observed. A useful report says “new alerts still name this domain after I tried to block it,” rather than “Chrome is hacked.” That gives the next person a specific issue to investigate.
When a permission change is not enough
If the problem is new tabs, persistent redirects, changed search settings or extensions returning unexpectedly, expand the investigation. Google’s unwanted-software guide lists these as possible signs of unwanted software and recommends checking for unwanted programs before resetting browser settings. They are reasons to investigate, not proof of a particular infection.
Use the official guidance for your operating system and ask your administrator for help on a managed machine. Avoid installing a cleaner advertised by the alert you are trying to investigate. A claimed emergency in the notification is not a reason to abandon the normal trusted route to security tools or account support.
Keep the final check proportionate. If the sole symptom was unwanted alerts from a permitted site and those alerts stop after you block it, you have evidence that the permission change addressed that symptom. You do not have evidence of a complete security audit. If other symptoms remain, record them separately rather than assuming they all share the same cause.
For future browsing, allow a site to notify you only when you want the alerts it describes. Reconsider the decision when its messages change or become unhelpful. Closing a private window is a separate matter; our guide to private browsing on a shared computer explains other records that deserve attention. Recheck these menu steps after a material Chrome settings redesign, and use the current Google Help instructions if labels differ.
Cover image: original AI-generated editorial illustration. People and scenes are fictional; no real event, device capture or first-hand test is depicted. This guide explains linked official documentation and uses expressly labelled hypothetical examples.